https://kubernetes.io/docs/tasks/administer-cluster/manage-resources/memory-default-namespace/
LimitRange If you mention the limits but not the requests then pod is assigned limit value as the request(for both memory and cpu) Make sure to have limits set for atleast memory and requests as well. You can set a default memory and cpu limit for a namespace as well. These are namespace scoped.
A LimitRange provides constraints that can:
- Enforce minimum and maximum compute resources usage per Pod or Container in a namespace.
- Enforce minimum and maximum storage request per PersistentVolumeClaim in a namespace.
- Enforce a ratio between request and limit for a resource in a namespace.
- Set default request/limit for compute resources in a namespace and automatically inject them to Containers at runtime.
Reference - https://kubernetes.io/docs/tasks/administer-cluster/limit-storage-consumption/
You can check namespace scoped resources via kubectl api-resources --namespaced=true
apiVersion: v1
kind: LimitRange
metadata:
  name: mem-limit-range
spec:
  limits:
    - default:
        memory: 512Mi
      defaultRequest:
        memory: 256Mi
      type: Container
If you set limit as 1gb and no requests, then both requests and limits will be set to 1gb. If you create a pod with request 1.5Gi and limit memory 800Mi, it will give error.
This limit range is applied to Pod or Container to set default limits by admin for them. The above example have default values which get applied if pod file does not have these
Setting namespace limits
Above code snippet generates LimitRange resource which is part of v1 and sets limit based on the type of values passed.
apiVersion: v1
kind: LimitRange
metadata:
  name: cpu-min-max-demo-lr
spec:
  limits:
    - max:
        cpu: "800m"
      min:
        cpu: "200m"
      type: Container
The above defines the max and min limits for pod and container in the namespace. Error will be shown if violated.
Extended resources
https://kubernetes.io/docs/tasks/administer-cluster/extended-resource-node/
It is possible to extend resources to a node like volume attached to it and you can divide it into further parts and advertise them as special storage of 100gb (8)
Put the correct node name to replace
curl --header "Content-Type: application/json-patch+json" \
  --request PATCH \
  --data '[{"op": "add", "path": "/status/capacity/example.com~1dongle", "value": "4"}]' \
  http://localhost:8001/api/v1/nodes/<your-node-name>/status
You can later remove them by curl request as well in above url.
CPU Management policies
Reference - https://kubernetes.io/docs/tasks/administer-cluster/cpu-management-policies/
If multiple pods running in node, it is possible cpu is throttled and pods workload may shift to other cpu cores based on availability. Many workloads are not sensitive to this migration and thus work fine without any intervention.
However, in workloads where CPU cache affinity and scheduling latency significantly affect workload performance, the kubelet allows alternative CPU management policies to determine some placement preferences on the node. There are 2 supported policies -
static- allows pods with certain resource characteristics to be granted increased CPU affinity and exclusivity on the nodenone(default)
Change Management policies
- Drain the node
kubectl drain --ignore-daemonsets <node name> - Stop kubelet
- Remove the old CPU manager state file. The path to this file is
/var/lib/kubelet/cpu_manager_stateby default. This clears the state maintained by the CPUManager so that the cpu-sets set up by the new policy won’t conflict with it. - Edit the kubelet configuration to change the CPU manager policy to the desired value
- Start kubelet
The kubectl drain subcommand on its own does not actually drain a node of its DaemonSet pods: the DaemonSet controller (part of the control plane) immediately replaces missing Pods with new equivalent Pods. The DaemonSet controller also creates Pods that ignore unschedulable taints, which allows the new Pods to launch onto a node that you are draining.
Once it returns (without giving an error), you can power down the node (or equivalently, if on a cloud platform, delete the virtual machine backing the node). If you leave the node in the cluster during the maintenance operation, you need to run kubectl uncordon <node name>
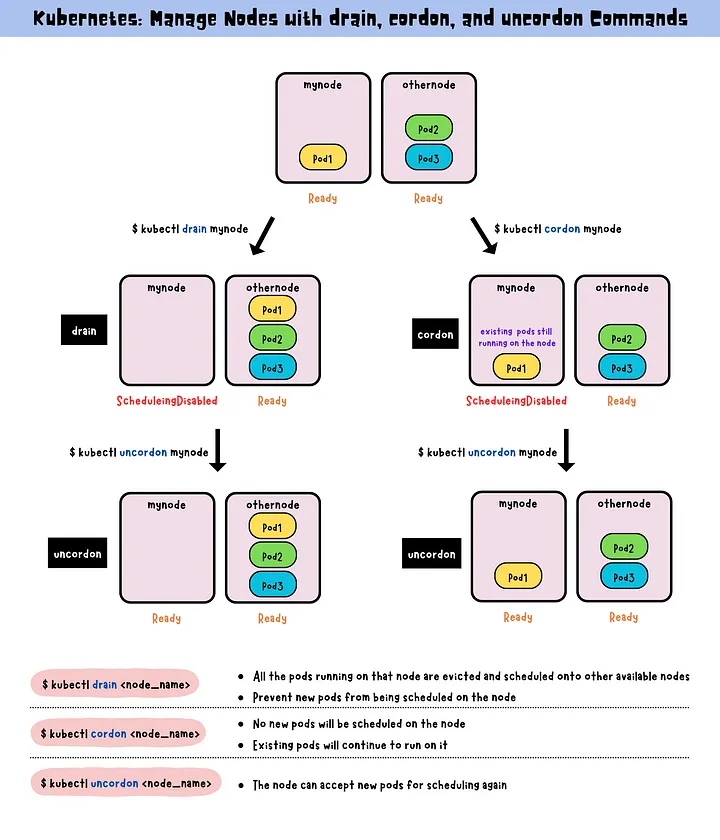
Cordon, drain and uncordon
The drain command is used to gracefully remove a node from service by evicting all pods running on that node, scheduling them onto other available nodes and preventing new pods from being scheduled. (When a node is drained, all the pods running on that node are evicted and scheduled onto other available nodes. At the same time, it also prevents new pods from being scheduled on that node.)
The cordon command is used to temporarily disable scheduling new pods on a node, while allowing existing pods to continue running until they complete.
The uncordon enables the scheduling of new pods onto a previously drained or cordoned node.
Qos Classes
Pods have 3 QoS(Quality of service) Classes -
- Guaranteed
- Burstable
- Best Effort
Guranteed
- Every Container in the Pod must have a memory limit and a memory request.
- For every Container in the Pod, the memory limit must equal the memory request.
- Every Container in the Pod must have a CPU limit and a CPU request.
- For every Container in the Pod, the CPU limit must equal the CPU request.
These restrictions apply to init containers and app containers equally. Ephemeral containers cannot define resources so these restrictions do not apply. Example -
apiVersion: v1
kind: Pod
metadata:
  name: qos-demo
  namespace: qos-example
spec:
  containers:
    - name: qos-demo-ctr
      image: nginx
      resources:
        limits:
          memory: "200Mi"
          cpu: "700m"
        requests:
          memory: "200Mi"
          cpu: "700m"
Burstable
- The Pod does not meet the criteria for QoS class Guaranteed
- At least one Container in the Pod has a memory or CPU request or limit
apiVersion: v1
kind: Pod
metadata:
  name: qos-demo-2
  namespace: qos-example
spec:
  containers:
    - name: qos-demo-2-ctr
      image: nginx
      resources:
        limits:
          memory: "200Mi"
        requests:
          memory: "100Mi"
No cpu limit
apiVersion: v1
kind: Pod
metadata:
  name: qos-demo-4
  namespace: qos-example
spec:
  containers:
    - name: qos-demo-4-ctr-1
      image: nginx
      resources:
        requests:
          memory: "200Mi"

    - name: qos-demo-4-ctr-2
      image: redis
First does not have memory requests
Best Effort When a pod does not have any limits/requests defined, they fall under catagory of best effort
Priority Classes, Preemption and Eviction
https://kubernetes.io/docs/concepts/scheduling-eviction/
Change nodeselector of pod via patch file
https://stackoverflow.com/questions/55357287/update-node-selector-field-for-pods-on-the-fly
spec:
  template:
    spec:
      nodeSelector:
        kubernetes.io/hostname: node-2
kubectl patch deployment nginx-deployment --patch "$(cat patch.yaml)"
ResourceQuota
https://kubernetes.io/docs/concepts/policy/resource-quotas/
It is used to set quota for namespace - storage, memory and cpu
- Different teams work in different namespaces. This can be enforced with RBAC.
- Users create resources (pods, services, etc.) in the namespace, and the quota system tracks usage to ensure it does not exceed hard resource limits defined in a ResourceQuota.
- If creating or updating a resource violates a quota constraint, the request will fail with HTTP status code 403 FORBIDDEN with a message explaining the constraint that would have been violated.
- If quota is enabled in a namespace for compute resources like cpu and memory, users must specify requests or limits for those values; otherwise, the quota system may reject pod creation. Hint: Use the LimitRanger admission controller to force defaults for pods that make no compute resource requirements.
Auditing
https://kubernetes.io/docs/tasks/debug/debug-cluster/audit/
Kubernetes auditing provides a security-relevant, chronological set of records documenting the sequence of actions in a cluster. The cluster audits the activities generated by users, by applications that use the Kubernetes API, and by the control plane itself.
Audit policy
Audit policy defines rules about what events should be recorded and what data they should include. The audit policy object structure is defined in the audit.k8s.io API group. When an event is processed, it’s compared against the list of rules in order. The first matching rule sets the audit level of the event. The defined audit levels are:
None- don’t log events that match this rule.Metadata- log request metadata (requesting user, timestamp, resource, verb, etc.) but not request or response body.Request- log event metadata and request body but not response body. This does not apply for non-resource requests.RequestResponse- log event metadata, request and response bodies. This does not apply for non-resource requests.
Find resource utilization WITHOUT metrics server via cgroups
https://octopus.com/blog/kubernetes-pod-cpu-memory
If the metrics service isn’t available, it’s still possible to determine the memory usage of a single pod by entering an interactive session and printing the contents of cgroup interface files. Current usage -
- cat /sys/fs/cgroup/memory/memory.usage_in_bytes
- cat /sys/fs/cgroup/cpu/cpuacct.usage
If not cgroup but cgroup2
- cat /sys/fs/cgroup/memory.current
- cat /sys/fs/cgroup/cpu.stat
Kubernetes exit codes - https://komodor.com/learn/exit-codes-in-containers-and-kubernetes-the-complete-guide/
horizontal pod autoscaler
https://kubernetes.io/docs/tasks/run-application/horizontal-pod-autoscale-walkthrough/
Refer above for load test and more info regarding hpa
Horizontal scaling means that the response to increased load is to deploy more Pods. This is different from vertical scaling, which for Kubernetes would mean assigning more resources (for example: memory or CPU) to the Pods that are already running for the workload.
Example via command kubectl autoscale deployment php-apache --cpu-percent=50 --min=1 --max=10
Example of declarative autoscaler -
apiVersion: autoscaling/v1
kind: HorizontalPodAutoscaler
metadata:
  name: php-apache
spec:
  scaleTargetRef:
    apiVersion: apps/v1
    kind: Deployment
    name: php-apache
  minReplicas: 1
  maxReplicas: 10
  targetCPUUtilizationPercentage: 50
Use v2 hpa for scaling policies
Crictl and cluster debugging
crictl is a command-line interface for CRI-compatible container runtimes. You can use it to inspect and debug container runtimes and applications on a Kubernetes node
https://kubernetes.io/docs/tasks/debug/debug-cluster/crictl/
Flow control - https://kubernetes.io/docs/reference/debug-cluster/flow-control/
Debug Endpoints - With the APIPriorityAndFairness feature enabled, the kube-apiserver serves the following additional paths at its HTTP(S) ports.
Make sure you have proper permissions to access this
API - /debug/api_priority_and_fairness/ and then specify nonResourceURLs
kubectl get --raw /debug/api_priority_and_fairness/dump_priority_levels
Pod Debugging
https://kubernetes.io/docs/tasks/debug/debug-application/debug-running-pod/#ephemeral-container
Multiple schedulers
- Kubernetes comes with default scheduler which may not be enough
- Multiple schedulers can run along the main scheduler.
- We can instruct which scheduler to use in pods for definition files
- Add a new field called schedulerName in pod yaml
- If scheduler not configured properly, pod will go in pending
- If multiple copies of same scheduler are running on different nodes(multi-master), one can be active via leader election
Network Policy
- Pods can communicate with any other pod as flat networking
- To control traffic flow at IP address at layer 3 and 4, we consider network policies
- When defining pod/namespace based network policy, use selector to specify traffic allowed to and from pod to match selector
apiVersion: networking.k8s.io/v1
kind: NetworkPolicy
metadata:
  name: allow-nginx
  namespace: default
spec:
  podSelector:
    matchLabels:
      app: nginx
  policyTypes:
    - "ingress"
    - "egress"
  ingress:
    - from:
        - podSelector:
            matchLabels:
              role: backend
        - podSelector:
            matchLabels:
              role: database
ETCD
- Distributed key-value store
- stores data regarding cluster like nodes, services, pods, configmaps, account, roles etc
- listens at port 2379 by default.
- Use etcdctl for etcd commands on etcd control pane such as backup.
- https://medium.com/@mehmetodabashi/backup-and-restore-etcd-cluster-on-kubernetes-93c19b1c070
- Take backup -
ETCDCTL_API=3 etcdctl --endpoints $ENDPOINT snapshot save snapshot.db, where endpoint is127.0.0.1:2379 - Restore backup from .db -
ETCDCTL_API=3 etcdctl --endpoints=https://127.0.0.1:2379 \
--cacert=/etc/kubernetes/pki/etcd/ca.crt \
--cert=/etc/kubernetes/pki/etcd/server.crt \
--key=/etc/kubernetes/pki/etcd/server.key \
snapshot save <backup-file-location>